Quickstart (AWS)
⏱️ Estimated time: ~1 hour (mostly asynchronous)
Overview
This guide will help you set up a new ExaDeploy system in AWS and run a demo application that offloads deep learning model computation to the remote GPU workers. It assumes you have existing EC2 instances which can be used to run the demo application (and where your company’s applications will run after integration with ExaDeploy).
Before starting, you will need to know some information about the VPC network and subnetwork(s) associated with the EC2 instances where you will run your application(s). This information is needed to set up VPC peering which will enable communication between the existing EC2 instances and the ExaDeploy system.
- The region the VPC is located in
- The ID of the VPC
- The CIDR range (IP address range) of the VPC
- The ID(s) of the subnets where the application(s) will run
For help getting this information, see Get existing networking information.
You should also be provided (from Exafunction):
- An API key used to identify your company to Exafunction
- An Exafunction release including an Exafunction Helm chart version and a list of image names to use for various ExaDeploy system components
If you want to try out ExaDeploy for free (with capped resources), reach out on our community Slack to get an API key and release!
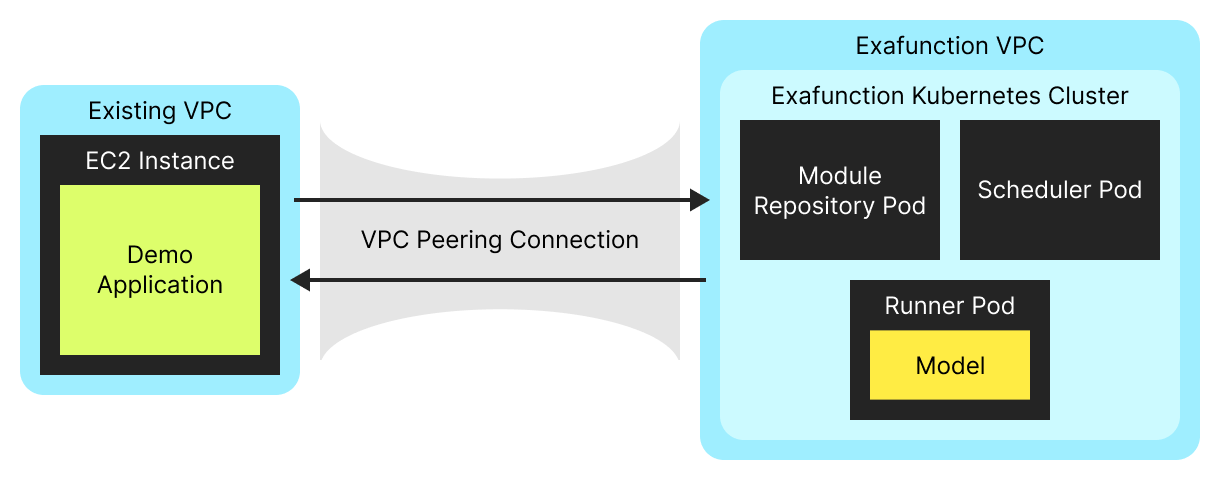
After completion of this quickstart guide, the overall system will look something like this (deployed entirely within your cloud account):
Set up cloud infrastructure
To set up all the required infrastructure, we provide the terraform-exafunction-aws-example repository. Please follow the instructions in the README to perform the setup. After this is complete, you should have a new VPC, EKS cluster, and ExaDeploy system running in that cluster.
Take note of the load balancer addresses for the module repository and scheduler services (see Running applications with ExaDeploy) as they will be needed to connect external applications to the ExaDeploy system.
Run a model with ExaDeploy
In this section of the tutorial you will run a simple application that loads and runs a ResNet50 model on a remote ExaDeploy GPU runner. This model is an image classifier that will be used to label this image of a kitten.

All the code below should run on your EC2 instance with Python 3.6+. For simplicity’s sake, we will assume you are ssh’d into the instance and running commands directly in the terminal.
Install pip packages
To run the demo application, you will need to download the Exafunction pip package as well as PyTorch pip packages (since the demo application uses a PyTorch model).
python3 -m pip install exafunction numpy torch torchvision
Download and configure the Python sample code
Run
curl -OJ https://storage.googleapis.com/exafunction-public/exadeploy_demo.py
to save the file below as exadeploy_demo.py on your EC2 instance.
"""Demo file for running a TorchScript model with ExaDeploy."""

import argparse
import io
import json
import os
import tempfile
from typing import List
from urllib import request

import numpy as np
import torch
import torchvision

import exa

IMAGE_URL = "https://raw.githubusercontent.com/awslabs/mxnet-model-server/master/docs/images/kitten_small.jpg"
IMAGE_LABELS_URL = "https://s3.amazonaws.com/deep-learning-models/image-models/imagenet_class_index.json"
TORCH_ZIP_URL = "https://storage.googleapis.com/exafunction-dist/exafunction-plugin-libtorch_v1.12-17c084a2.zip"


def _get_image() -> np.ndarray:
    """Get sample image as numpy array for image classification."""
    with tempfile.TemporaryDirectory() as tmpdir:
        os.makedirs(os.path.join(tmpdir, "images"), exist_ok=True)
        request.urlretrieve(
            IMAGE_URL, os.path.join(tmpdir, "images", "kitten_small.jpg")
        )
        image, _ = torchvision.datasets.ImageFolder(
            tmpdir,
            torchvision.transforms.Compose(
                [
                    torchvision.transforms.Resize([224, 224]),
                    torchvision.transforms.ToTensor(),
                    torchvision.transforms.Normalize(
                        mean=[0.485, 0.456, 0.406], std=[0.229, 0.224, 0.225]
                    ),
                ]
            ),
        )[0]
    return image.numpy()[np.newaxis, ...]


def _get_top_image_labels(output: np.ndarray, n: int = 5) -> List[str]:
    """Get the top n labels for image classification output."""
    with request.urlopen(IMAGE_LABELS_URL) as image_labels_file:
        class_idx = json.load(image_labels_file)
    return [class_idx[str(idx)][1] for idx in output.argsort()[: -(n + 1) : -1]]


def main():
    # Parse command line arguments.
    parser = argparse.ArgumentParser()
    parser.add_argument("--module_repo_addr", type=str, required=True)
    parser.add_argument("--scheduler_addr", type=str, required=True)
    args = parser.parse_args()

    # Create ResNet50 model and convert to TorchScript.
    model = torchvision.models.resnet50(
        pretrained=True  # Used pretrained to support older versions of `torchvision`.
    ).eval()
    torchscript_file = io.BytesIO()
    torch.jit.save(torch.jit.script(model), torchscript_file)

    # Upload plugin and model to module repository.
    with exa.ModuleRepository(
        repository_address=f"{args.module_repo_addr}:50051"
    ) as repo:
        print("Loading TorchScript plugin")
        objects, _ = repo.load_zip_from_url(TORCH_ZIP_URL)
        print("Registering model in module repository")
        repo.register_torchscript(
            "ResNet50",
            torchscript_file=torchscript_file,
            input_names=["input_tensor"],
            output_names=["output_tensor"],
            plugin=objects[0],
        )

    # Run model on remote ExaDeploy runner.
    print("Starting session to run TorchScript model")
    with exa.Session(
        scheduler_address=f"{args.scheduler_addr}:50050",
        module_repository_address=f"{args.module_repo_addr}:50051",
        placement_groups={
            "default": exa.PlacementGroupSpec(
                module_contexts=[exa.ModuleContextSpec(module_tag="ResNet50")]
            )
        },
    ) as sess:
        _output = sess.new_module("ResNet50").run(
            input_tensor=sess.from_numpy(_get_image())
        )["output_tensor"].numpy()[0]
    print(f"Top 5 image labels: {_get_top_image_labels(_output)}")


if __name__ == "__main__":
    main()
Run the demo application
Run the script, passing in the addresses for the module repository and scheduler services (which were obtained through the instructions in the README) as command line flags:
python3 exadeploy_demo.py --module_repo_addr <MODULE_REPO_ADDR> --scheduler_addr <SCHEDULER_ADDR>
You should see output that looks something like:
Loading TorchScript plugin
Registering model in module repository
Starting session to run TorchScript model
...
(ExaDeploy session logging)
...
Top 5 image labels: ['tabby', 'Egyptian_cat', 'tiger_cat', 'lynx', 'Persian_cat']
Note that while loading the TorchScript plugin and registering the TorchScript model in the module repository may take a minute or two, in a production environment this would only need to be done once and subsequent inference calls can use the registered plugin and model without having to reload/register them.
The first time this script is run, it may take a couple minutes to create the session as the runner image will need to be pulled from the container registry onto the EKS node.
Additional sections
Get existing networking information
This section covers how to get the required information about your existing VPC and subnet.
As a quick overview, an AWS Virtual Private Cloud (VPC) network is a regional virtual network that defines an IP address range and provides connectivity between EC2 instances, EKS clusters, and other AWS resources. A VPC contains one or more subnetworks (subnets) which each reside in an availability zone within the VPC’s region and define a sub-range of the VPC’s IP address range. EC2 instances exist in these subnets and are assigned an IP address from the containing subnet’s range.
To start, navigate to the EC2 page in the AWS console and go to the Instances section on the side bar. Make sure to be in the right region where your EC2 instance is located; this region is also the VPC’s region. Click on the Instance ID for one of your EC2 instances to go to the instance details page (the URL should be https://<region>.console.aws.amazon.com/ec2/v2/home?region=<region>#InstanceDetails:instanceId=<instance_id>).
This page should contain the VPC ID and subnet ID associated with the instance.

Click on the VPC ID to navigate to the VPCs page filtered to just your VPC. Here, locate your VPC’s CIDR range (IP address range).

If you will be running applications on multiple EC2 instances associated with different subnets, take note of all the associated subnet IDs as they will be needed to ensure all EC2 instances are able to communicate with the ExaDeploy system.
Debug common issues
Unable to find exafunction pip distribution
- Symptoms:
- When running
pip install exafunction, you encounter the errors:
- When running
ERROR: Could not find a version that satisfies the requirement exafunction (from versions: none)
ERROR: No matching distribution found for exafunction
- Cause:
- This is likely due to Exafunction not having built a pip package for your specific version of Python.
- Resolution:
- Please message the Exafunction team and include your Python version information (
python --version) and we will make sure to provide a compatible pip package.
- Please message the Exafunction team and include your Python version information (
ExaDeploy client unable to connect to ExaDeploy system
- Symptoms:
- Error when running script:
Runner ID 668471189866960634 failed with status Unavailable: Runner error: failed to connect to all addresses
- Cause:
- This is likely caused by incorrect network configuration preventing the client’s requests from routing to the ExaDeploy system
- Resolution:
- Double check that the subnet your EC2 instance is running on was specified in the Terraform configuration file.
- If it was not, add it and rerun the
create.shscript.
Get in contact
We want to help you get started with ExaDeploy and hear about your experience to make things even better - reach out on our community Slack to get in contact!